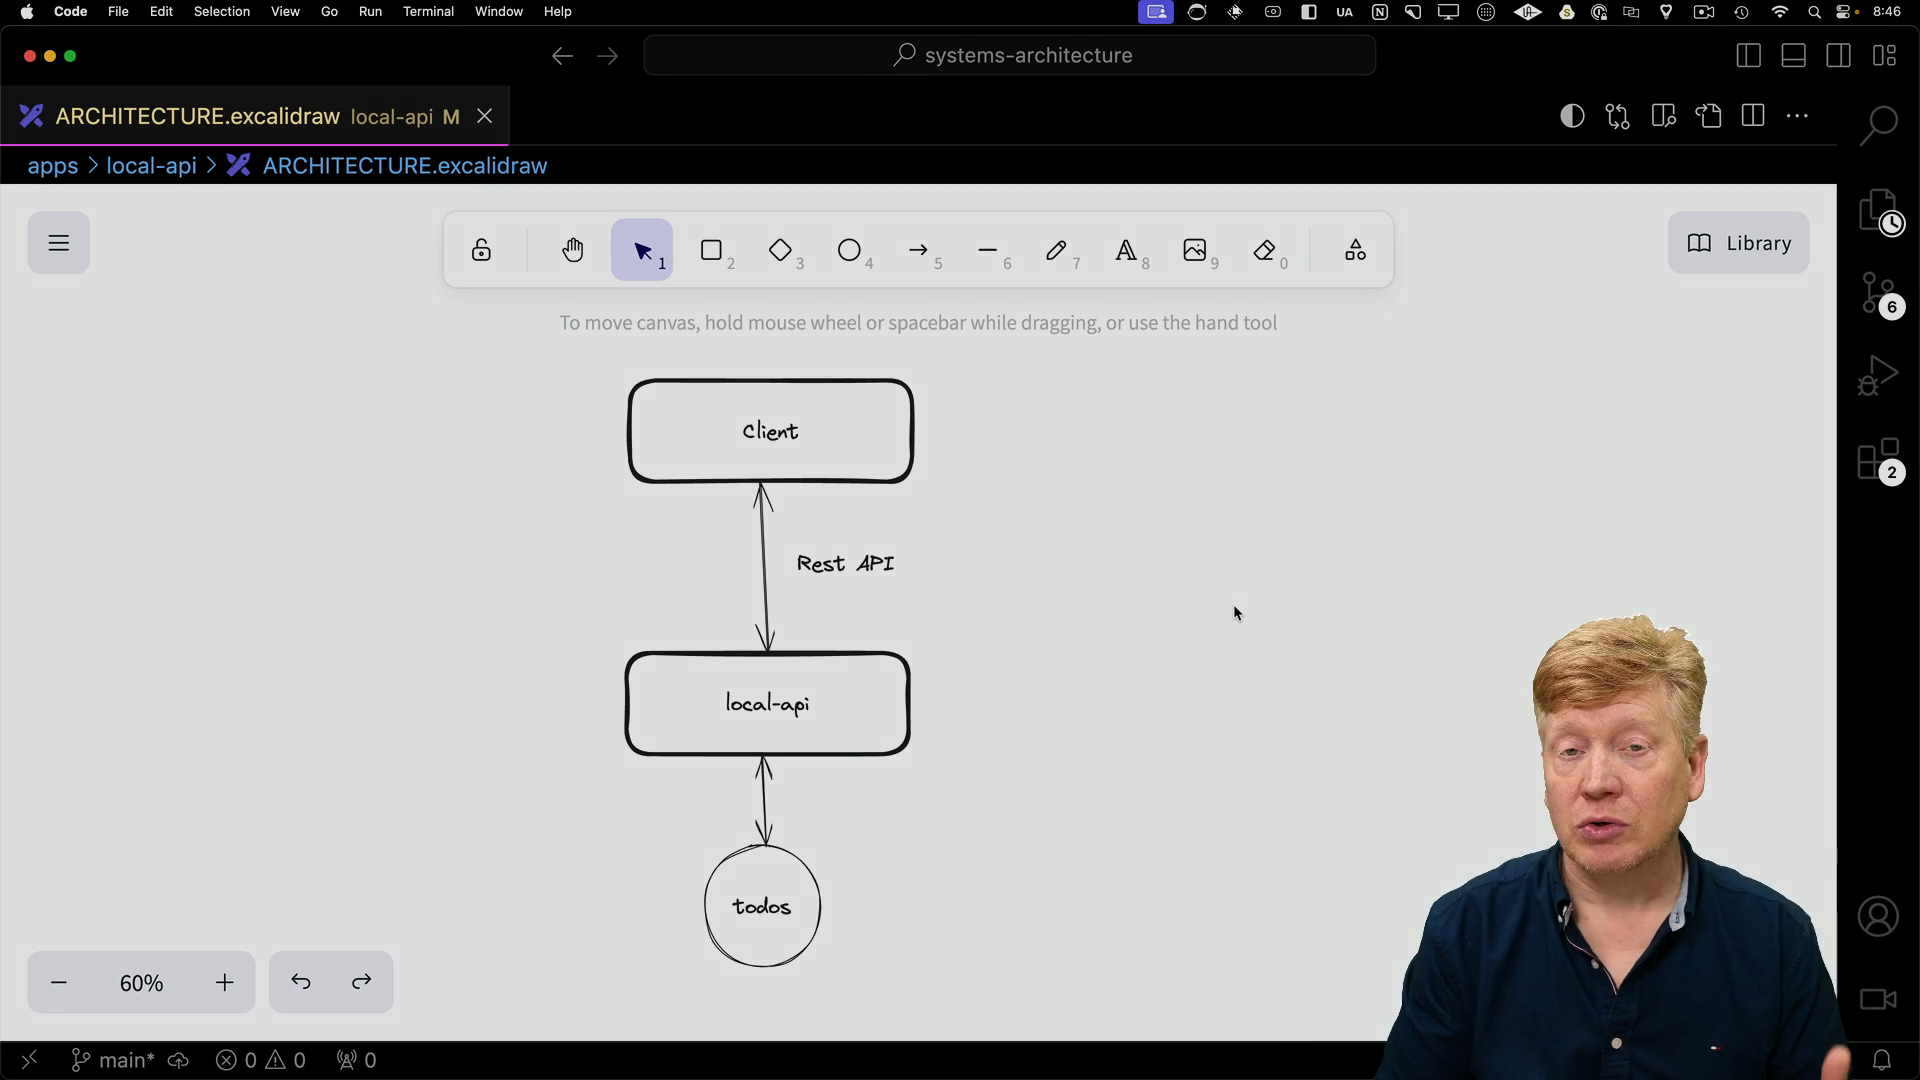
Let's look at the variation of the local systems architecture where our Next.js application communicates with a local API route instead of relying on server actions.
This approach is particularly useful when you have multiple clients, such as a web browser, mobile app, or desktop app, that need to access the same API.

The to-do data is stored in an in-memory database, and we'll use Next.js API routes to handle client requests.
Client-Side Implementation
Let's start by examining the client-side code for our to-do list inside of the local-api directory.
page.tsx
In the homepage component, page.tsx, we use React Server Components (RSC) to fetch data. First, we check if the user is logged in using getAuthorization. We then retrieve a hardcoded list of priorities. If the user is logged in, we fetch the to-dos:
// inside of app/page.tsx
import { auth } from "@/auth";
import { Todo, PRIORITIES, getTodos } from "@repo/todos";

import AuthButton from "@/components/AuthButton.server";

import TodoList from "./TodoList";

export default async function Home() {
  const session = await auth();

  const priorities: string[] = PRIORITIES;

  const todos: Todo[] = session?.user?.id
    ? await getTodos(session?.user?.id)
    : [];

  return (
    <main>
      <AuthButton />
      {session?.user && <TodoList todos={todos} priorities={priorities} />}
    </main>
  );
}
The homepage then renders the TodoList component, passing in the fetched to-dos and priorities:
TodoList.tsx
The ToDoList component handles displaying and managing the to-dos. It retrieves the todos and priorities from its props and maintains a local copy of the to-dos.
"use client";
import { useState } from "react";
import {
  Select,
  SelectContent,
  SelectItem,
  SelectTrigger,
  SelectValue,
} from "@/components/ui/select";
import { Input } from "@/components/ui/input";
import { Checkbox } from "@/components/ui/checkbox";

import { Todo } from "@repo/todos";
import { Button } from "@/components/ui/button";

export default function TodoList({
  priorities,
  todos: initialTodos,
}: {
  priorities: string[];
  todos: Todo[];
}) {
  const [todos, setTodos] = useState<Todo[]>(initialTodos);
  const [priority, setPriority] = useState<string>(priorities[0]);
  const [title, setTitle] = useState<string>("");

  const updateTodos = async () => {
    const res = await fetch("/api/todos", {
      cache: "no-cache",
    });
    setTodos(await res.json());
  };

  const onSubmit = async () => {
    await fetch("/api/todo", {
      method: "POST",
      headers: {
        "Content-Type": "application/json",
      },
      body: JSON.stringify({
        title,
        priority,
        completed: false,
      }),
    });
    updateTodos();
  };

  const onSetCompleted = async (id: string, completed: boolean) => {
    await fetch(`/api/todo/${id}`, {
      method: "PUT",
      headers: {
        "Content-Type": "application/json",
      },
      body: JSON.stringify({ completed }),
    });
    updateTodos();
  };

  const onDelete = async (id: string) => {
    await fetch(`/api/todo/${id}`, {
      method: "DELETE",
    });
    updateTodos();
  };

  return (
    <div className="mt-5">
      {todos && (
        <>
          <ul>
            {todos?.map((todo) => (
              <li key={todo.id} className="flex gap-2 items-center mb-3">
                <Checkbox
                  checked={todo.completed}
                  onClick={() => onSetCompleted(todo.id, !todo.completed)}
                />
                <div className="flex-grow">{todo.title}</div>
                <Button variant="destructive" onClick={() => onDelete(todo.id)}>
                  Delete
                </Button>
              </li>
            ))}
          </ul>
        </>
      )}
      <div className="flex gap-2">
        <Select value={priority} onValueChange={(v) => setPriority(v)}>
          <SelectTrigger className="w-[180px]">
            <SelectValue placeholder="Priority" />
          </SelectTrigger>
          <SelectContent>
            {priorities.map((priority) => (
              <SelectItem value={priority} key={priority}>
                {priority}
              </SelectItem>
            ))}
          </SelectContent>
        </Select>
        <Input
          placeholder="Todo"
          value={title}
          onChange={(evt) => setTitle(evt.target.value)}
        />
        <Button onClick={onSubmit}>Submit</Button>
      </div>
    </div>
  );
}
The TodoList component interacts with the various API routes using fetch to add, update, and delete to-dos. After each mutation, it calls updateTodos to re-fetch the to-dos and update the UI.
APIs
Now, let's shift our attention to the API routes responsible for handling these requests. These routes are located in the app/api directory.
Getting All To-Dos
The /api/todos route handles retrieving the list of to-dos. It first checks if the user is authenticated. If authenticated, it returns the list of to-dos. If not, it returns an error:
// inside of app/api/todos/route.ts

import { auth } from "@/auth";

import { NextResponse } from "next/server";

import { getTodos } from "@repo/todos";

export async function GET() {
  const session = await auth();

  if (!session?.user?.id) return NextResponse.error();

  return NextResponse.json(await getTodos(session?.user?.id));
}
Creating a New To-Do
The /api/todo route with a POST request creates a new to-do. First, it verifies if the user is logged in. If so, it adds the new to-do to the database, revalidates the / route to reflect the changes, and returns the newly created to-do.
// inside of app/api/todo/route.ts

import { revalidatePath } from "next/cache";
import { NextResponse } from "next/server";

import { auth } from "@/auth";
import { getTodoById, deleteTodo, updateTodoCompletion } from "@repo/todos";

export async function GET(
  req: Request,
  { params: { id } }: { params: { id: string } }
) {
  const session = await auth();

  if (!session?.user?.id) return NextResponse.error();

  return NextResponse.json(await getTodoById(session?.user?.id, id));
}

export async function PUT(
  req: Request,
  { params: { id } }: { params: { id: string } }
) {
  const session = await auth();

  if (!session?.user?.id) return NextResponse.error();

  const body = await req.json();
  const out = await updateTodoCompletion(session?.user?.id, id, body.completed);
  revalidatePath("/");
  return NextResponse.json(out);
}

export async function DELETE(
  req: Request,
  { params: { id } }: { params: { id: string } }
) {
  const session = await auth();

  if (!session?.user?.id) return NextResponse.error();

  const out = await deleteTodo(session?.user?.id, id);
  revalidatePath("/");
  return NextResponse.json(out);
}
Similarly, we have routes for getting a single to-do (/api/todo/:id with GET), updating a to-do (/api/todo/:id with PUT), and deleting a to-do (/api/todo/:id with DELETE).
When to Use This Architecture
By separating the client-side logic from the API endpoints, this approach provides flexibility and scalability, especially when dealing with multiple client applications.
While server actions excel in scenarios with a single client (the web browser), the API route approach shines when you need to share your API with other clients or platforms.