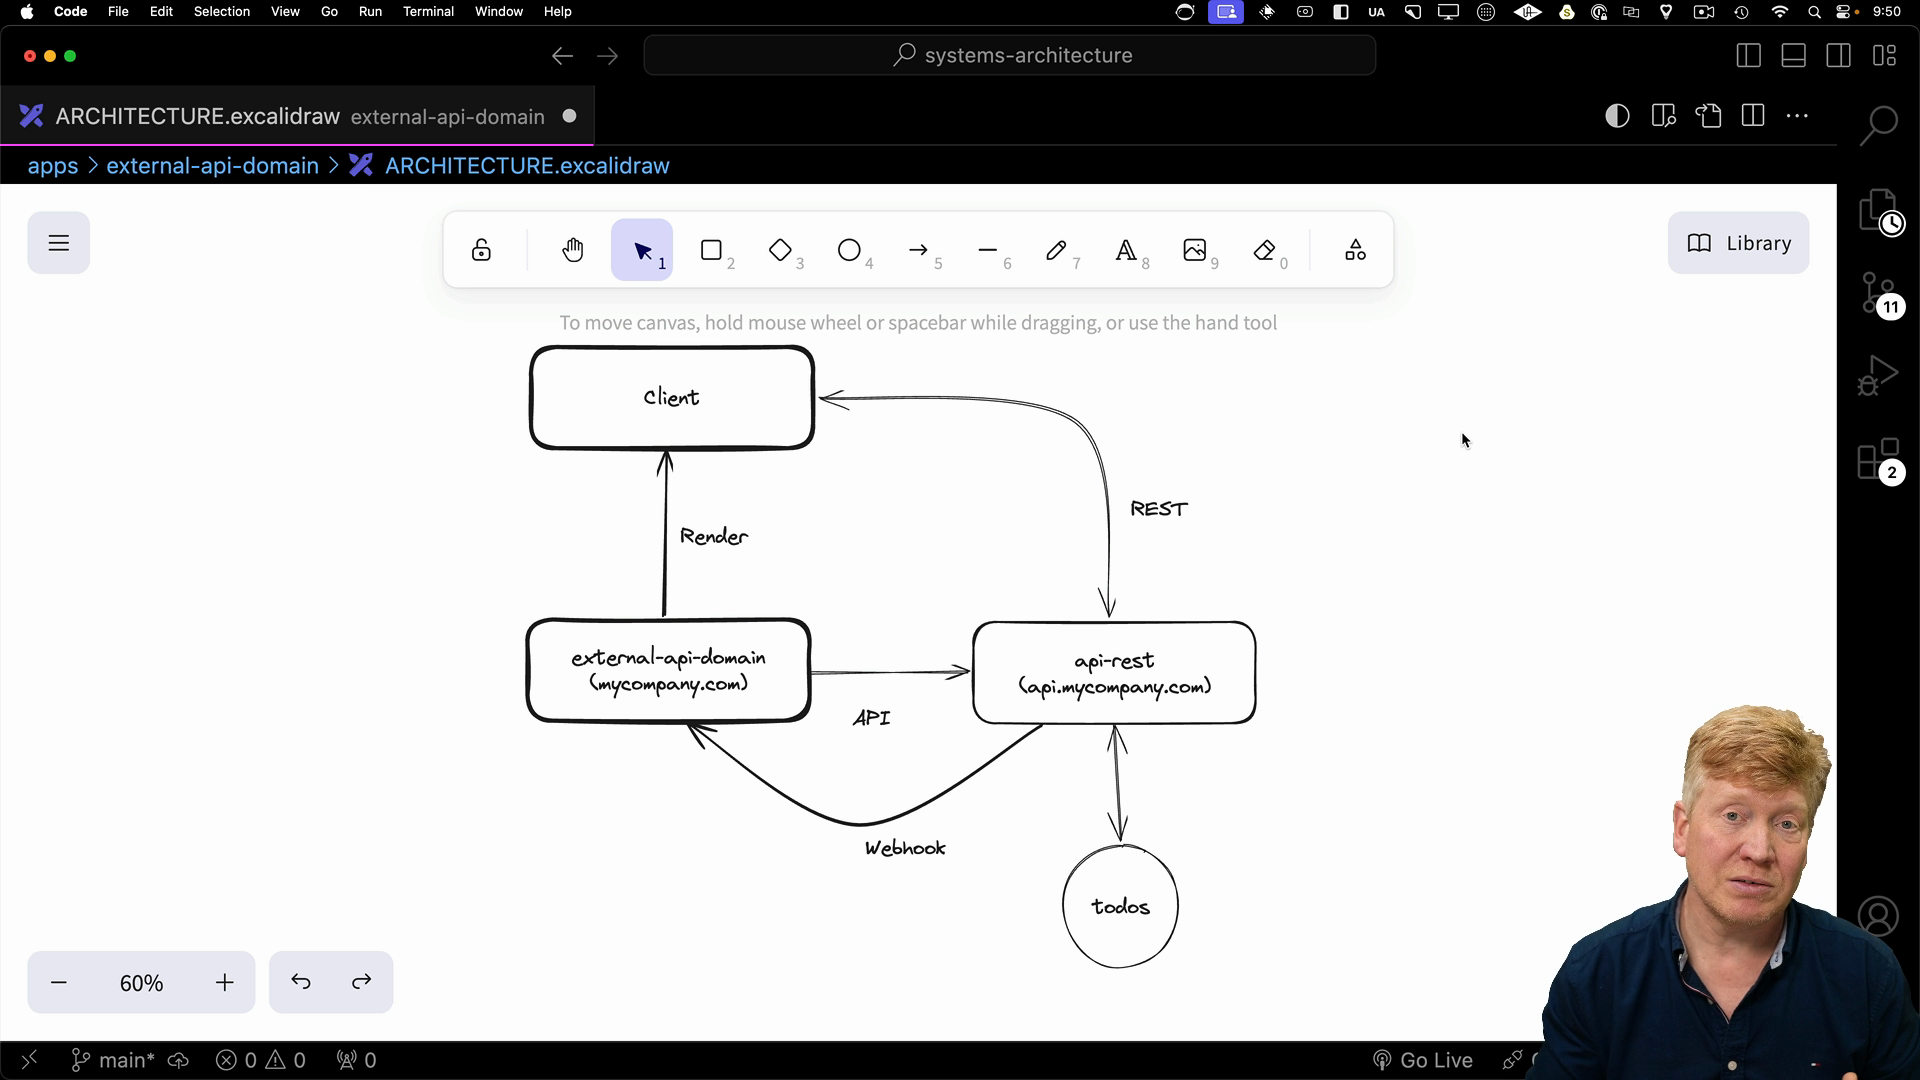
This demonstration illustrates a Next.js application communicating directly with an external API using REST.
Imagine your Next.js server, hosted on mycompany.com, needs to interact with an external REST API. That's pretty standard stuff.
Here's the interesting part. If the API changes, it triggers a webhook to tell the Next.js server to update its cache. This ensures we always have the latest data.
After the Next.js server fetches data, it passes it to a client-side component. When the client component needs to modify data, it talks directly to the API using api.mycompany.com. Again, a webhook notifies the Next.js server to revalidate the cache.
Think of it this way: the server fetches the initial data, and the client handles updates, both talking to the same API.
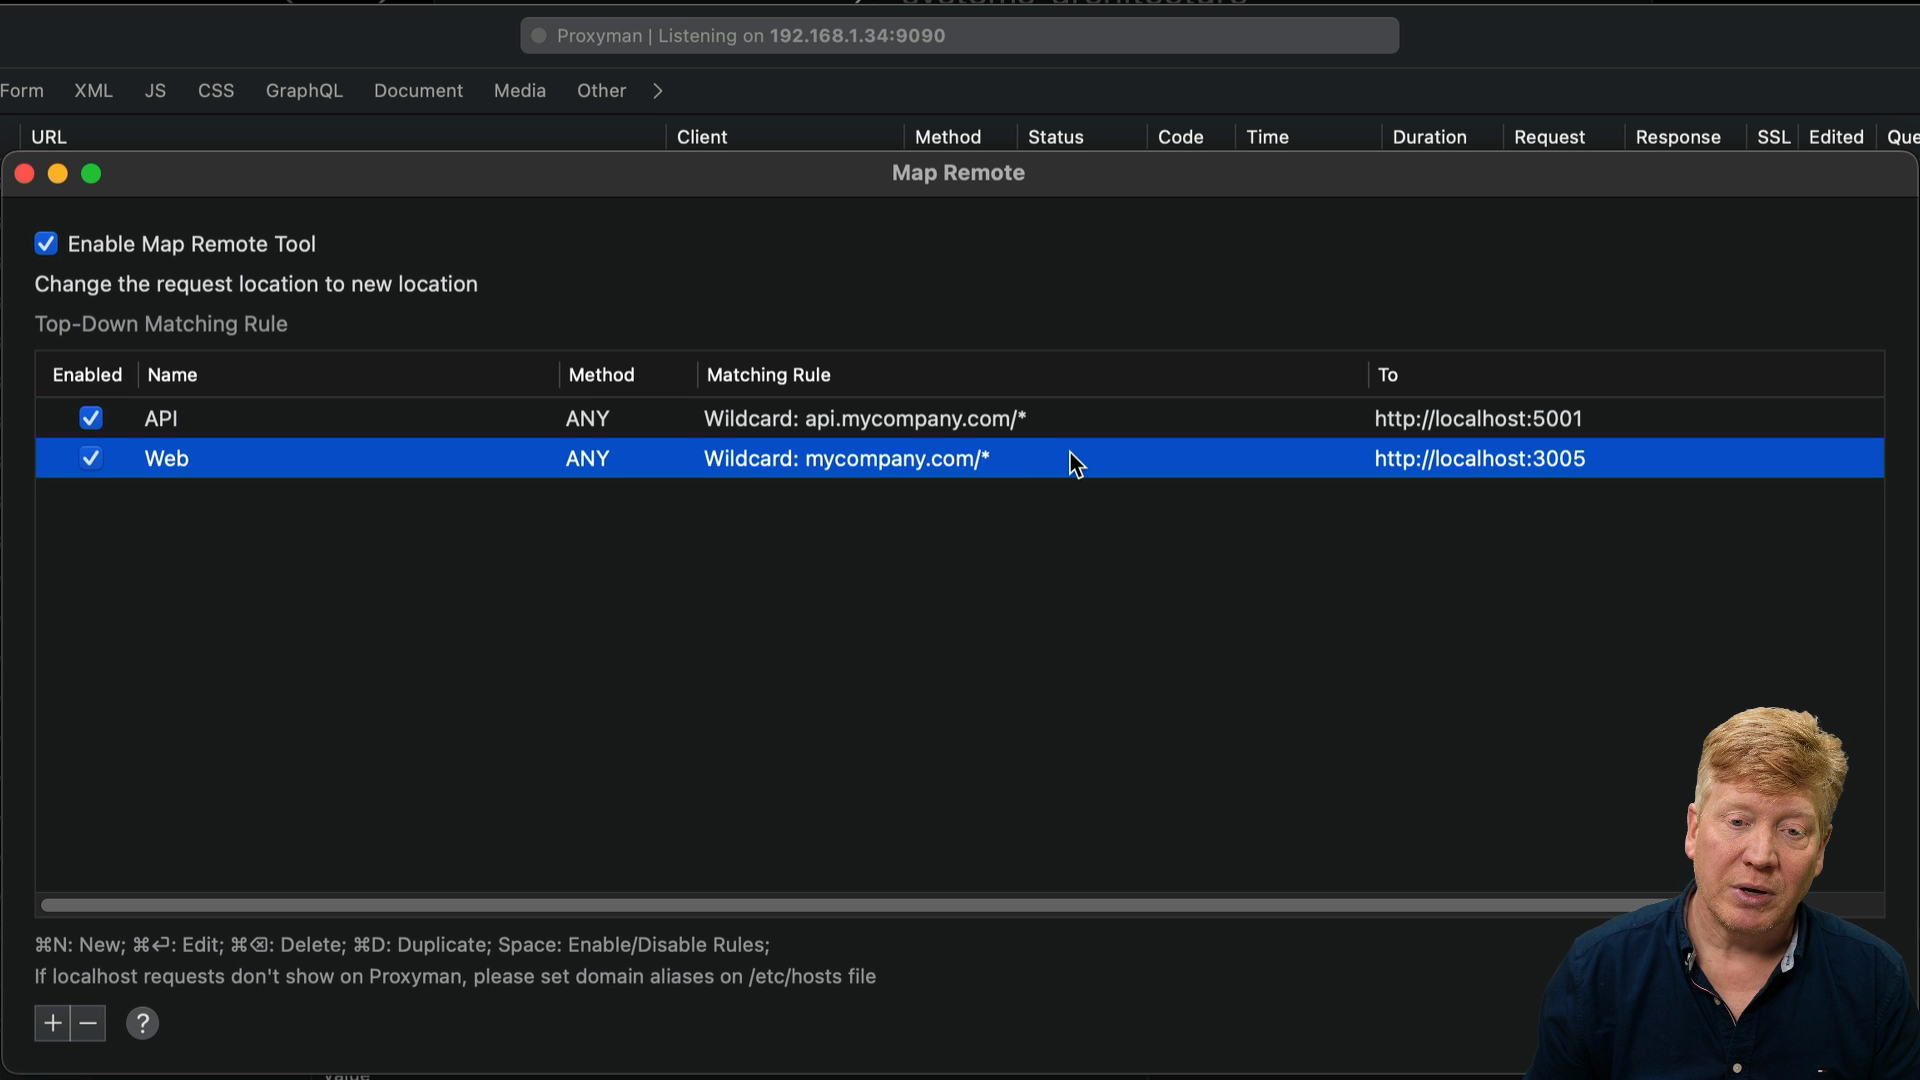
Setting Up Proxyman
Since we're working locally, we'll use Proxyman to map our domains:
api.mycompany.comwill point to our local API running onlocalhost:5001.web.mycompany.comwill point to our Next.js development server onlocalhost:3005.
This allows us to mimic the behavior of an external API without actually deploying anything.
The Application in Action
When we run our application and interact with it, you'll see that client-side mutations are sent directly to api.mycompany.com. If we add a new to-do item, it persists even after refreshing the page, demonstrating that our updates are working correctly.
When interacting with the example app in the browser, you'll see requests to api.mycompany.com for mutations and webhooks to mycompany.com for cache invalidation.
Examining the Code
Let's dive into the code to understand how the different parts interact.
Data Fetching on the Server (RSC)
Inside of the home page componente at apps/external-api-domain/src/app/page.tsx we make requests to the API to fetch our to-do list. Ideally, we'd use api.mycompany.com, but since we're using Proxyman we'll stick with localhost:5001 for now.
The data fetching process looks similar to before: We retrieve the user's session. We fetch priorities, which doesn't require authentication. Finally, we fetch to-dos, including the user's JWT token from the cookie in the request headers.
import { headers } from "next/headers";

import { auth } from "@/auth";
import { Todo } from "@repo/todos";

import AuthButton from "@/components/AuthButton.server";

import TodoList from "./TodoList";

export default async function Home() {
  const session = await auth();

  const priorities: string[] = await fetch(
    "http://localhost:5001/priorities"
  ).then((resp) => resp.json());

  const todos: Todo[] = session?.user
    ? await fetch("http://localhost:5001/todos", {
        cache: "no-cache",
        headers: headers(),
      }).then((resp) => resp.json())
    : [];

  return (
    <main>
      <AuthButton />
      {session?.user && <TodoList todos={todos} priorities={priorities} />}
    </main>
  );
}
Once we have both priorities and to-dos, we render the page.
Client-Side TodoList
The real magic happens in the client-side ToDoList component. It receives the initial to-dos and priorities from the server. We store this initial data in the component's state. When updating the list (adding, completing, or deleting items), the component directly calls api.mycompany.com with the necessary credentials. This works because we include the credentials option in our fetch requests, ensuring the browser sends cookies for the appropriate domain.
"use client";
import { useState } from "react";
import {
  Select,
  SelectContent,
  SelectItem,
  SelectTrigger,
  SelectValue,
} from "@/components/ui/select";
import { Input } from "@/components/ui/input";
import { Checkbox } from "@/components/ui/checkbox";

import { Todo } from "@repo/todos";
import { Button } from "@/components/ui/button";

export default function TodoList({
  priorities,
  todos: initialTodos,
}: {
  priorities: string[];
  todos: Todo[];
}) {
  const [todos, setTodos] = useState<Todo[]>(initialTodos);
  const [priority, setPriority] = useState<string>(priorities[0]);
  const [title, setTitle] = useState<string>("");

  const updateTodos = async () => {
    const res = await fetch("http://api.mycompany.com/todos", {
      credentials: "include",
      cache: "no-cache",
    });
    setTodos(await res.json());
  };

  const onSubmit = async () => {
    await fetch("http://api.mycompany.com/todo", {
      method: "POST",
      credentials: "include",
      headers: {
        "Content-Type": "application/json",
      },
      body: JSON.stringify({
        title,
        priority,
        completed: false,
      }),
    });
    updateTodos();
  };

  const onSetCompleted = async (id: string, completed: boolean) => {
    await fetch(`http://api.mycompany.com/todo/${id}`, {
      method: "PUT",
      credentials: "include",
      headers: {
        "Content-Type": "application/json",
      },
      body: JSON.stringify({ completed }),
    });
    updateTodos();
  };

  const onDelete = async (id: string) => {
    await fetch(`http://api.mycompany.com/todo/${id}`, {
      method: "DELETE",
      credentials: "include",
    });
    updateTodos();
  };

  return (
    <div className="mt-5">
      {todos && (
        <>
          <ul>
            {todos?.map((todo) => (
              <li key={todo.id} className="flex gap-2 items-center mb-3">
                <Checkbox
                  checked={todo.completed}
                  onClick={() => onSetCompleted(todo.id, !todo.completed)}
                />
                <div className="flex-grow">{todo.title}</div>
                <Button variant="destructive" onClick={() => onDelete(todo.id)}>
                  Delete
                </Button>
              </li>
            ))}
          </ul>
        </>
      )}
      <div className="flex gap-2">
        <Select value={priority} onValueChange={(v) => setPriority(v)}>
          <SelectTrigger className="w-[180px]">
            <SelectValue placeholder="Priority" />
          </SelectTrigger>
          <SelectContent>
            {priorities.map((priority) => (
              <SelectItem value={priority} key={priority}>
                {priority}
              </SelectItem>
            ))}
          </SelectContent>
        </Select>
        <Input
          placeholder="Todo"
          value={title}
          onChange={(evt) => setTitle(evt.target.value)}
        />
        <Button onClick={onSubmit}>Submit</Button>
      </div>
    </div>
  );
}
Cache Invalidation with Webhooks
Inside of the api/callback/route.ts file is the webhook route that handles cache invalidation. When the API makes a mutation, it sends a POST request to this route with the event type and relevant data. The route then revalidates the cache for the specific page associated with the updated data:
import { revalidatePath } from "next/cache";
import { NextResponse } from "next/server";

export async function POST(req: Request) {
  revalidatePath("/");
  return NextResponse.json({ success: true });
}
Looking at the Request
Inside the REST API endpoint at apps/api-rest/src/server.ts we see that when a mutation occurs, a webhook is sent to the Next.js server. This webhook includes the event type and relevant data. The server then checks if a front-end server is defined in the environment variables, and if so, sends a POST request to the webhook route:
// inside apps/api-rest/src/server.ts
function postWebhook(event: string, payload: any) {
  console.log("Posting webhook", process.env.FRONTEND_SERVER, event, payload);
  if (process.env.FRONTEND_SERVER) {
    fetch(`${process.env.FRONTEND_SERVER}/api/callback`, {
      method: "POST",
      headers: {
        "Content-Type": "application/json",
      },
      body: JSON.stringify({
        event,
        payload,
      }),
    });
  }
}
Bringing It All Together
This setup demonstrates a robust way to handle communication between a Next.js application and an external API in a real-world scenario.
While setting up all the pieces can be tricky, having a template like this makes the process much smoother. This example acts as a template for working in larger company examples.