Let's look at the server actions variant of the Backend-for-Frontend (BFF) architecture. In this setup, our Next.js application acts as a client-facing frontend and a backend-for-frontend (BFF), communicating with a REST microservice using server actions.
In this case, we are going to use server actions to talk between the client and the Next.js App Router application inside of the bff-sa directory.
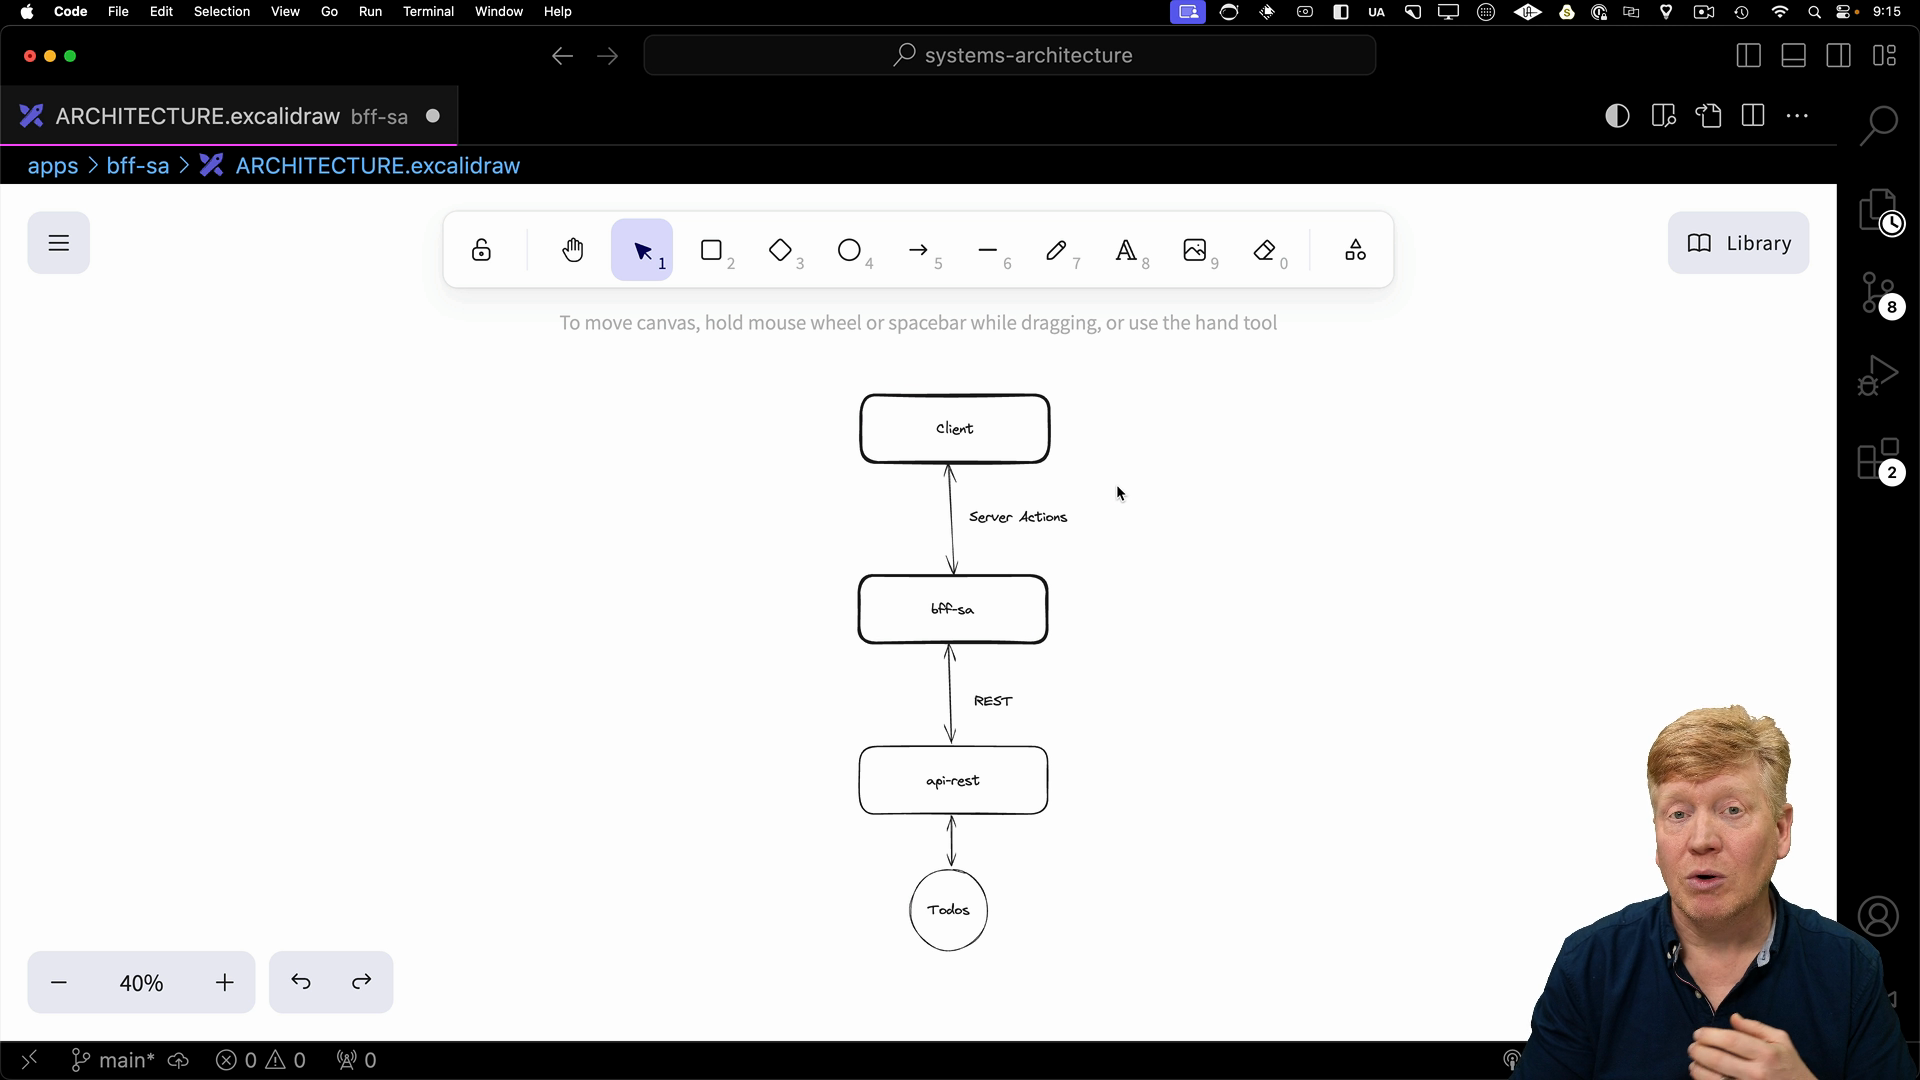
Understanding the Architecture
Our application architecture involves three main components:
- Next.js App (BFF): This acts as a client-facing frontend and a backend-for-frontend (BFF). It handles user interactions, server-side rendering, and communication with the microservice.
- Server Actions: These functions, running on the server-side within our Next.js application, provide a secure way to interact with the microservice.
- REST Microservice: This independent service handles the application's core logic and data persistence.
Looking at the Code
Most of the work happens in the homepage RSC at app/page.tsx. We start by fetching the API server location from the environment variables, then the callTodoService helper function is set up to make REST endpoint calls to the microservice.
One of the important things to note is that we pass cookies from the incoming request to the REST API for authentication. This ensures that the REST API knows who is making the request. Priorities are unauthenticated, while to-dos are authenticated and require a user ID.
The addTodoAction server action demonstrates the key concepts. It takes in a title, priority, and completed status for a new to-do. It uses the "use server" pragma, gets the authorization locally, then after the POST will revalidate the root path to reflect the latest data.
The updateCompletion and deleteToDo functions will function similarly:
import { auth } from "@/auth";
import { Todo } from "@repo/todos";
import { revalidatePath } from "next/cache";
import { headers } from "next/headers";

import AuthButton from "@/components/AuthButton.server";

import TodoList from "./TodoList";

const API_SERVER = process.env.API_SERVER;

async function callTodoService(
  url: string,
  method: "GET" | "PUT" | "DELETE" | "POST" = "GET",
  body?: any
) {
  const req = await fetch(`${API_SERVER}${url}`, {
    method,
    headers: {
      Cookie: headers().get("Cookie")!,
      "Content-Type": "application/json",
    },
    body: body ? JSON.stringify(body) : undefined,
  });
  return await req.json();
}

export default async function Home() {
  const session = await auth();

  const priorities: string[] = await callTodoService("/priorities");

  const todos: Todo[] = session?.user?.id
    ? ((await callTodoService("/todos")) as Todo[])
    : [];

  async function addTodoAction(
    title: string,
    priority: string,
    completed: boolean = false
  ) {
    "use server";
    const session = await auth();
    if (!session?.user?.id) throw new Error("User not authenticated");

    await callTodoService("/todo", "POST", {
      title,
      priority,
      completed,
    });

    revalidatePath("/");
  }

  async function updateTodoCompletionAction(
    todoId: string,
    completed: boolean
  ) {
    "use server";
    const session = await auth();
    if (!session?.user?.id) throw new Error("User not authenticated");

    await callTodoService(`/todo/${todoId}`, "PUT", { completed });

    revalidatePath("/");
  }

  async function deleteTodoAction(todoId: string) {
    "use server";
    const session = await auth();
    if (!session?.user?.id) throw new Error("User not authenticated");

    await callTodoService(`/todo/${todoId}`, "DELETE");

    revalidatePath("/");
  }

  return (
    <main>
      <AuthButton />
      {session?.user && (
        <TodoList
          todos={todos}
          priorities={priorities}
          addTodoAction={addTodoAction}
          updateTodoCompletionAction={updateTodoCompletionAction}
          deleteTodoAction={deleteTodoAction}
        />
      )}
    </main>
  );
}
The TodoList Client Component
Now let's take a look at how the TodoList.tsx component consumes these server actions.
The TodoList component takes in the priorities, todos, and server actions as props. It manages local state for the new to-do title and priority. The onSubmit, onSetCompleted, and onDelete functions handle interactions with the server actions.
This direct communication pattern simplifies data management by delegating backend interactions to the server:
// inside app/TodoList.tsx
"use client";
import { useState } from "react";
import {
  Select,
  SelectContent,
  SelectItem,
  SelectTrigger,
  SelectValue,
} from "@/components/ui/select";
import { Input } from "@/components/ui/input";
import { Checkbox } from "@/components/ui/checkbox";

import { Todo } from "@repo/todos";
import { Button } from "@/components/ui/button";

export default function TodoList({
  priorities,
  todos,
  addTodoAction,
  updateTodoCompletionAction,
  deleteTodoAction,
}: {
  priorities: string[];
  todos: Todo[];
  addTodoAction: (title: string, priority: string, completed?: boolean) => void;
  updateTodoCompletionAction: (todoId: string, completed: boolean) => void;
  deleteTodoAction: (todoId: string) => void;
}) {
  const [priority, setPriority] = useState<string>(priorities[0]);
  const [title, setTitle] = useState<string>("");

  const onSubmit = async () => {
    await addTodoAction(title, priority);
  };

  const onSetCompleted = async (id: string, completed: boolean) => {
    await updateTodoCompletionAction(id, completed);
  };

  const onDelete = async (id: string) => {
    await deleteTodoAction(id);
  };

  return (
    <div className="mt-5">
      {todos && (
        <>
          <ul>
            {todos?.map((todo) => (
              <li key={todo.id} className="flex gap-2 items-center mb-3">
                <Checkbox
                  checked={todo.completed}
                  onClick={() => onSetCompleted(todo.id, !todo.completed)}
                />
                <div className="flex-grow">{todo.title}</div>
                <Button variant="destructive" onClick={() => onDelete(todo.id)}>
                  Delete
                </Button>
              </li>
            ))}
          </ul>
        </>
      )}
      <div className="flex gap-2">
        <Select value={priority} onValueChange={(v) => setPriority(v)}>
          <SelectTrigger className="w-[180px]">
            <SelectValue placeholder="Priority" />
          </SelectTrigger>
          <SelectContent>
            {priorities.map((priority) => (
              <SelectItem value={priority} key={priority}>
                {priority}
              </SelectItem>
            ))}
          </SelectContent>
        </Select>
        <Input
          placeholder="Todo"
          value={title}
          onChange={(evt) => setTitle(evt.target.value)}
        />
        <Button onClick={onSubmit}>Submit</Button>
      </div>
    </div>
  );
}
Benefits of This Architecture
By using server actions and a REST microservice, the Next.js application doesn't need to directly manage data. Instead, it can rely on the microservice as the source of truth. Server actions provide a secure channel for communication, protecting sensitive data and operations.